About Learning the Basics of Self Defense...

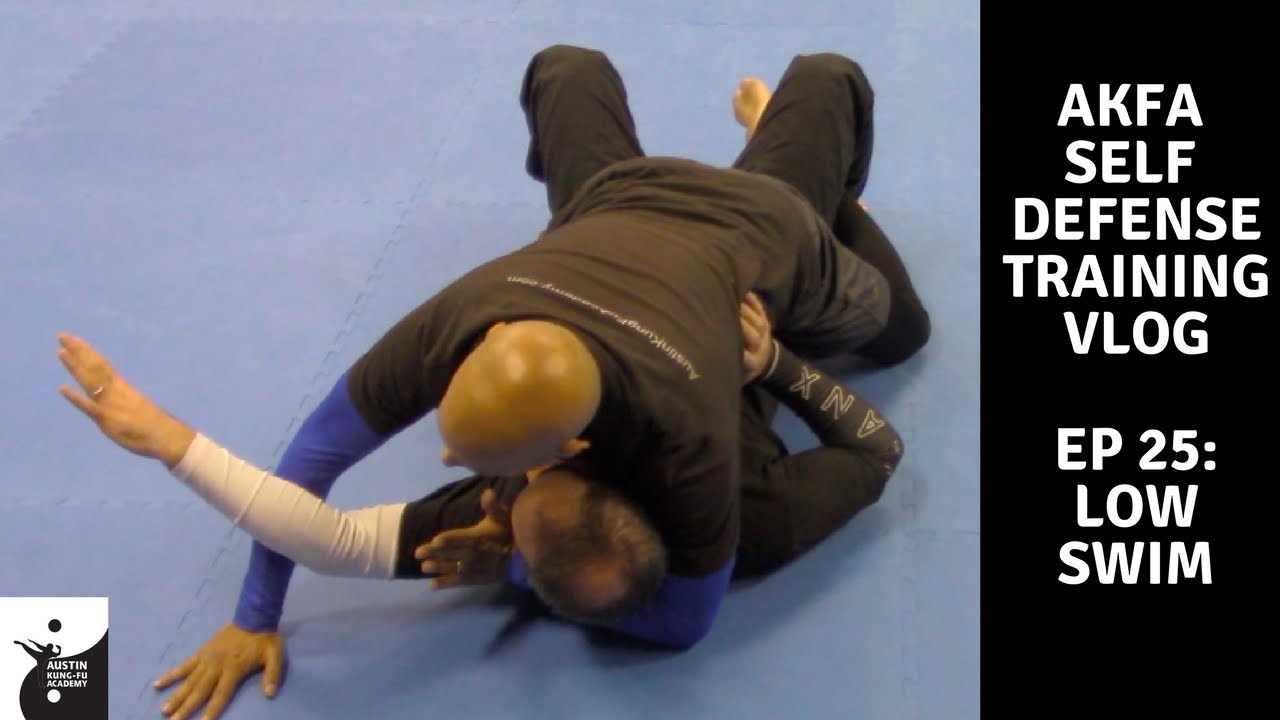
Bear in mind, there are a ba-jillion and a half what-if scenarios. However, we can't solve the world's problems without a basic alphabet for communication. And that is what I'm trying to give everyone, is a basic alphabet to work from. So, we have to learn to write these letters really well, before we begin writing words and sentences. 

Here's a good analogy:

OK kids, today we're going to learn how to write the letter G. It makes a "gun" sound, and guess what? Sometimes it makes a "juh" sound, too! So let's practice writing the letter G.

Then someone asks, "Well what about words like light and tough?"

Teacher says, "Yes, well, the letter G can take on different sounds when combined with other letters, and we'll totally talk about that in another class."

Another student says, "OK, cool. What about words like gnome and gigantic??"

Teacher, "Yes, those are all different applications that we'll cover on a different day. Let's get to practicing the letter G..."

Another student says, "In Spanish, for Guadalupe, we say, 'wadalupe".

Teacher: Very interesting, but that's another language altogether. We're running out of time, let's start working on writing the letter G.

Another student: How do we know when it has to have the "guh" sound and when to have the "juh" sound?

Teacher: Wonderful questions, but let's please try to focus on writing the letter G. I promise, all your questions will be answered the more time you spend with it.

I'm not saying to not ask questions, but when you're trying to acquire a foundation, it is best to paint by the numbers a bit first. Then once that foundation has developed, by all means, create the most bizarre and insane scenarios you want! How about this one:
What if someone sneaks up behind you, and wraps a wet carpet around you, and rolls you into their van? 

Double Ankle Sweep Knee Thrust - If They Go Low, You Go Lower!

You have 'em in Stage 1 of the Guard, right? Ok, so check it out - if they're bringing their feet up, but their hips are still closer to the ground, you can't just put your feet on their hip flexors and knock 'em down like you do in the Kick Variation of the Double Ankle Sweep.

No problem. So now you do the Knee Thrust variation of the Double Ankle Sweep. All you gotta do is when you feel their feet come up, grab up the top of their head, and make sure they can't get any higher. In fact, that might cause them to resist your head pull, which will help us knock them down, LOL!

So once you do that, their arms will come on the inside to choke you (or push down or whatever), at which point, you uncross your legs from the Guard Stage 1, and invert your knees and grab their ankles with thumbless grips, all at once!

So from there, you will pull on their ankles and push with your shins/knees (hence the name, "Knee Thrust", got it?). And a little bonus detail, bump your hips upward as you do the pull with hands and push with the shins/knees. 

After you knock 'em down, it's not over. They will not just stay down, they will try to get up. And you are in a mangled position, so here's the follow up of what you do:
Sit up, post off of your right elbow. Drive your right knee over their leg, and let it touch the ground. You're going to then want to pivot from your right knee, to swivel the foot counterclockwise toward the back. As you do that, reach for their neck with your left hand. From there, settle into the Full Mount Position, and go ahead and throw in the hooks and hand!

When you do the attacker/training partner role, just make sure to step up, and stay low. Be sure to break fall with both palms slapping the ground, keeping your head off the ground. Then, start sitting up, and your partner will eventually wrap around the back of your neck. 

Lots of stuff! Make sure you really understand the Kick variation of the Double Ankle Sweep first. 

Follow me for more Martial Arts Instruction on social media:
Twitter - @AustinKungFu
Instagram - @AustinKungFuAcademy
Facebook - Facebook.com/AustinKungFuAcademy

https://youtu.be/HtnzNFw3i6Y

AKFA SDTV 32.png

Armbar From The Guard, Low Variation - Create Just Enough Space!

Ok, let's just back up a second, to get some perspective. They punched at your face - you clinched them. They try to break out of your clinch by scooting their hips back - you pull Guard. You have them in Stage 1 of the Guard - great!

Now that you're there, there are a lot of things that can happen. One is that they bring their arms on the inside to choke you! They are doing this while you have them in Stage 1, where their head and body are low. 
So this is where we do the Low Variation of the Armbar from the Guard. 
Bring your left arm (the one that had the arm wrap from Stage 1) around the back of their neck. Swim the right arm (the one that had the head control from Stage 1) down to hook onto their leg. Rotate your body about 90 degrees to the right, like a turtle spinning on its shell. Get your right leg up underneath their arm. TAKE YOUR LEFT HAND AND GRAB ONTO THEIR RIGHT SHOULDER AND PUSH UPWARD ON THEIR NECK WITH YOUR FOREARM- this will create space to then bring your left leg around and bite down on the back of their neck and at the same time, grab their right wrist with your left hand. 
Pull out your right hand that had hooked onto their leg, and grab their right wrist, so now both your hands should be grabbing their right arm.
And then finally, clamp down with your legs, bridge your hips up, and pull their arm downward all at once, for the break. 

As the partner, make sure you tap when you feel the pressure on your elbow joint!!

Follow me for more Martial Arts Instruction on social media:
Twitter - @AustinKungFu
Instagram - @AustinKungFuAcademy
Facebook - Facebook.com/AustinKungFuAcademy

https://youtu.be/5-PWxcnHRXQ

AKFA SDTV 31.png

Triangle Choke 1.5 Set Up - They Punch You, You Choke Them!

From Stage 1 of the Guard, the attacker might throw punches to your ribs. For that, we definitely would want to go into Stage 2. If they are getting a little tired from all of your controls, and they take one more last ditched effort at hitting your ribs, you could do the Triangle Choke 1.5 Set Up.

What we do here is the first half of Stage 2, which is inserting our shin against their bicep, and holding their tricep. That part is the same. What is different is that you have to do a neck control at the same time.
From there, you buck your hips up a little, and slide your 1.5 grip on their arm down to their wrist. Push their arm up a little, creating a little hole, and pull your foot out of that hole, and wrap your ankles around their back for the Triangle Set Up.

From there, it is the standard Triangle Choke steps:
-Stay safe from punches by bucking your hips up, and having your arms up.
-When they tire out, drop your hips, swim your hand under theirs, and bring their arm across their neck, holding it down with a motorcycle grip.
-Then put your right hand on the back of their head.
-Then put your left foot on their hip and walk back on your shoulders as your right leg clamps around their neck.
-Then grab your right ankle with your left hand and pull towards your face.
-Replace your left hand with the left leg for a lock-up.
-Finally, apply the three points of pressure - squeeze the thighs, pull down one the head, bridge your hips.

Follow me for more Martial Arts Instruction on social media:
Twitter - @AustinKungFu
Instagram - @AustinKungFuAcademy
Facebook - Facebook.com/AustinKungFuAcademy

https://youtu.be/lsJp5VF2B98

AKFA SDTV 30.png

Stage 5 Roll Over Technique - Don't Even Give Them A Chance!

Don't even give them a chance to get in  :) Remember, if you manage the distance, you manage the damage!

When you are in Stage 5 of the Guard, there's a chance that the attacker might try to grab your ankle and move your legs out of the way, so they can come in on an angle to strike you or side mount on you. 

In this situation, we need the the Stage 5 Roll Over Technique, where we use the momentum of their pull to rotate at an angle, be on our side, and plant our other foot on their midsection or hip. From there, we straighten up, and replace that foot with the other one, so that you are back to Stage 4. 

This is a very effective technique! It can literally keep the attacker away, and potentially make them realize that you are not going to be very easy to get to. Although we didn't demonstrate it, you should really practice this one on both sides pretty early on. The reason for that is we have no idea which foot they will decide to pull. If they move to their right, that means your right foot will be up, with a chance of being pulled. If they move to their left, that means your left foot will be up, with a chance of being pulled. So this is one of those times where the attacker decides on the dexterity of the technique.

Make sure to really rotate on your side. Don't just cross your legs, and certainly, don't flip over onto your belly! It might sound silly, but I've seen it happen multiple times, enough to warrant and explanation of caution!

Follow me for more Martial Arts Instruction on social media:
Twitter - @AustinKungFu
Instagram - @AustinKungFuAcademy
Facebook - Facebook.com/AustinKungFuAcademy

https://youtu.be/WCycddm1Hc4

maxresdefault (3).jpg

Headlock Counter - RNC Finish!

This technique, the Headlock Counter - Rear Naked Choke Finish, is really a consolidation of the following videos:
1. Headlock Counter - Prevent the Get-Up
2. Taking the Back
3. Rear Naked Choke - Strong Side

Let's go through it, shall we?
You have the Mount. They try to headlock you from the bottom to roll you off. You Modify your Mount. You strike their face, and cause them to roll to their knees, and when that happens, you Take The Back. You land on your strong side (i.e. the Overhook side), and you execute the Strong Side variation of the Rear Naked Choke.

That's it! That's the drill! So, don't try to start with this technique. Definitely make sure you have the others that are listed down pretty well. Once you have those, then go ahead and put them together like this.

Follow me for more Martial Arts Instruction on social media:
Twitter - @AustinKungFu
Instagram - @AustinKungFuAcademy
Facebook - Facebook.com/AustinKungFuAcademy

https://youtu.be/Lc9CHEvZYiU

AKFA SDTV 28.png

Headlock Counter - Prevent The Get-Up

You got the Mount, you are in the most dominant position in a street fight. It is possible that the attacker might try to headlock you down there, roll to their knees and try to throw you off.

In this case, we use the Headlock Counter - Prevent the Get-Up technique.

When they first wrap their arm around your neck and headlock you and try to pull your head down, modify your Mount, just like you did in the Take the Back lesson. 

Then if they try to get up, by crossing their legs and trying to get up on their knees, that's when you literally scoot your whole body back, pulling your forward foot in, and pushing backwards off of it. This will effective knock down their attempt to get up.

Simple and effective technique. It does require you to feel your partner to get up, and develop the timing right, so take it slowly when you're first practicing and learning this move.

Follow me for more Martial Arts Instruction on social media:
Twitter - @AustinKungFu
Instagram - @AustinKungFuAcademy
Facebook - Facebook.com/AustinKungFuAcademy

https://youtu.be/Dxdr-euLCfM

maxresdefault (1).jpg

Remount Technique - A quick recovery!

Taking the Back is a very dominant position in a street fight. It is also known as the Back Mount. Once you have it, you generally wait for them to calm down, and then apply a Rear Naked Choke. But, if they some how squirm a little loose, and their back starts slipping towards the ground, and they start turning towards you, that's when you use the Remount Technique.

The Remount Technique puts you back into the standard Mount position. 

Let's say you have taken their back, and you have a right overhook and a left underhook, and you land on the right side (this is called the Strong Side). If they start slipping out, your left arm reaches across their shoulders around their neck, and your left leg moves across their abdomen. 

You tuck in your right elbow, drop your right foot to the ground and pull in towards your butt. Push off of your right foot, right elbow, and right shoulder to turn towards them, as your head goes lower. All of this part happens pretty much at once!

We like to call this the "Shoulder Get Up", where we post on our foot and shoulder to rotate our body to a pronate position. 

This one will feel awkward when you first try it. My advice is to do it in the air a few times, and then try it with a person. You'll start getting the hang of it.
 
Follow me for more Martial Arts Instruction on social media:
Twitter - @AustinKungFu
Instagram - @AustinKungFuAcademy
Facebook - Facebook.com/AustinKungFuAcademy

https://youtu.be/Wa8JPoHeCZU

AKFA SDTV 26.png

Low Swim - Don't Let Them Wrap Your Arm!

You have the Mount, which is great! It is the best place to be in a street fight because of how dominant the position is. We've explored some of the possible reactions your attacker might have when you establish the mount, such as pushing you straight up (for which you should use the High Swim technique), turn around and try to get on their back (for which you should use the Take the Back technique), or they might push you side to side (for which you should use the Hooks and Hands technique). 

From the last scenario, where you use the Hooks and Hands as a response to their sideways pushes, they may try to wrap your arm, out of despair, just to have some sort of control on you. And it is in this case that we use the Low Swim technique.

As they try to wrap your posted arm, you stiffen it, and get them to push really hard to try to wrap. Once you feel them exert the energy, you simply spiral-turn your hand inward and back out to the posed position! Your hand literally makes a 360 degree circle, spiraling in toward your body and back out. 

BE CAREFUL! Don't move it too quick when you feel them try to grab your arm! It is one of the most common mistakes, which is to spiral the arm just from their initial contact or reach for your arm. This actually makes you more vulnerable to getting your arm caught! It is critical that you STIFFEN YOUR ARM, and make them PRESS down with some energy before you do this move. 

This move is one of those cases where you have to let them give you some energy before you can make your technique work successfully.

Follow me for more Martial Arts Instruction on social media:
Twitter - @AustinKungFu
Instagram - @AustinKungFuAcademy
Facebook - Facebook.com/AustinKungFuAcademy

https://youtu.be/QaGRp2E-d18

maxresdefault.jpg

Fish Hook Elbow Escape

This technique requires that you know how to do the Elbow Escape. If you do, then great! Keep reading. If not....you know what you need to do!

So, once again, you did not intend for it to happen, but it did - you got mounted by the attacker. You tried to Trap and Roll them off, but their arm was to stiff to grab. You tried to push their leg down and pop your knee out for a standard Elbow Escape, but their leg is too stiff!

This is when you need the Fish Hook variation of the Elbow Escape! What you have to do is take your right leg over your left, insert your toes/foot under their ankle. You see, there is a SPACE there, and in that space, you insert your foot. 

Once your foot is there, then you lift their leg with yours, while you push down on their thigh, and pop your left knee out of there. 

And that's it! That's what makes the Fish Hook! After that, it is all standard Elbow Escape steps. Trap the leg, hug the neck, push off of their other thigh while shrimping to get your other knee out, your leg on their back, post the knee out's foot to shrimp the other way, and wrap your leg around and put them into Stage 1. (Again, If what I just said didn't make sense, then you really do need to go back and study the main Elbow Escape video)

This is a sneaky move, that is all based on feel. You literally cannot see what is going on. Practice this, and you'll develop the sensitivity to know which Elbow Escape to use.

Follow me for more Martial Arts Instruction on social media:
Twitter - @AustinKungFu
Instagram - @AustinKungFuAcademy
Facebook - Facebook.com/AustinKungFuAcademy

https://youtu.be/jXTcwAYy-GM

AKFA SDTV 24.png

Elbow Escape - The Art of Squirming! ;)

You didn't intend for it to happen, but it did. You got mounted. The attacker got on top of you. You try to go for the trap and roll, that is, the escape from punches technique from being mounted, but, it doesn't work!!

This is when you need the Elbow Escape. If you are unable to roll them off, then put them in your Guard. The Guard is a very valuable position, because there are so many things we can do both defensively and offensively from there.

So in order to do the Elbow Escape, you need to know how to "shrimp". All that is, is putting one foot on the ground, and scooting your hips/bottom in that direction, by pushing off of that foot.

First, we hug their back, keep our head in, staying safe from punches, and attempt to wrap their arm. They stiffen their arm, making it unwrappable.
Second, we flatten our left leg, and then push down on their thigh as we pop our left knee outward. Keep that left leg connected to the ground while you do this.
Third, our left leg goes over their leg, and traps it.
Fourth, our left arm comes upward, almost as if to slick your hair/head back, and wraps around the back of their neck, to hold them down (remember, if they can sit up, they can punch you, so hold them down!).
Fifth, with your left foot, make sure it posts to the ground, and while you push on their knee/leg with your right hand, shrimp your bottom to the left, and pop your right knee out (just the knee, don't worry about the whole leg, yet).
Sixth, put your left leg on their back. This will prevent them from trying to get up and attempt to cross/side mount you. 
Seventh, now post your right foot on the ground, and shrimp your bottom to the right.
Eighth, now you've created the space to bring your right leg around, to cross ankles with your left leg, and with that, you control their head and arm to put them into Stage 1 of the Guard.

***WHEW***

That was a lot of steps! Take your time with this one. 8 steps, and within each steps, sometimes there are multiple things you have to do. The skill you develop from learning the Elbow Escape will transfer to other techniques, so you are definitely developing a foundation that you will build off of for future self defense techniques.

Follow me for more Martial Arts Instruction on social media:
Twitter - @AustinKungFu
Instagram - @AustinKungFuAcademy
Facebook - Facebook.com/AustinKungFuAcademy

https://youtu.be/S2sUxu-x6Fs

AKFA SDTV 23.png

Block and Shoot Shrimp Escape - Know This!!

Ok, so let's set this up a little, so we have some context. They punched at you, you clinched them, they tried to push off of your shoulders and scoot their hips back, and then you pulled guard. From the guard you get through to stage 5, where they are standing up, trying to walk around to your side. Your foot is up in the air, following them.

All of a sudden, they grab your ankle and swing your leg out of the way, and try to get on top of you by entering from your side.

This is when you use the Block and Shoot Shrimp Escape! You stop their momentum, do some maneuvering, and put them back in your guard.

So, how do we do this?
As they enter, post one hand on their shoulder and the other on their hip. 
Then, swing your legs into them - one with the shin cutting through on their abdomen, the other on their back. 
From there, get your hands in position for head and arm control to stay safe from punches, or them creating any distance.
Then, push your shin off of their legs to back up a little bit.
After that, post that foot on the ground, so that you can shrimp your hips away and get your foot out to wrap around their back, to put them into stage 1.

This move might seem a little complex, but get this down now, you'll see similar motions when we explore the Elbow Escape.

This Block and Shoot Shrimp Escape is very valuable. When you're on the ground and they're trying to get on top of you, this is the move you need, for sure!

Follow me for more Martial Arts Instruction on social media:
Twitter - @AustinKungFu
Instagram - @AustinKungFuAcademy
Facebook - Facebook.com/AustinKungFuAcademy

https://youtu.be/v4nZxf6VCeQ

AKFA SDTV 22.png

Side Mount to Mount Transition

You are in the Side Mount (aka Side Control). You have prevented them from rolling you off, and they have calmed down, trying to figure out what to do. This is your moment to get into the Mount position, the most dominant position in a fight.

So the Side Mount to Mount Transition is a critical technique to know, to get into the best position. What you have to do is first bring your knees in. Bring one knee in under their armpit. Bring the other knee by their hip. Keep your hands clamped and head down. 

From there, take your knee by their hip, and slide your shin over their lower abdomen. 

Then take the hand that is under their arm out and post it. Why? So if they buck their hips, you still have control and won't get rolled off. 

From there, touch your knee to the ground on the other side, and voila! You are in the Mount position!

The key thing is to stay close, stay low. If you leave too much space, you might get struck or rolled off. 

Sure, there are submissions from the Side Mount, but a good rule of thumb is position before submission. Don't try to chase submissions when they still have a lot of energy. Get into the best position, and let them exhaust their energy.

True Story:
Ryron Gracie submitted me with his Side Mount! His Side Mount control was so heavy and crushing that I had to tap!

So position is key, and that's why in this stage of our Self Defense Training Vlog, we'd rather focus on how to get into the best position against a street fighting attacker. So, learn the Side Mount to Mount transition really well!

Follow me for more Martial Arts Instruction on social media:
Twitter - @AustinKungFu
Instagram - @AustinKungFuAcademy
Facebook - Facebook.com/AustinKungFuAcademy

https://youtu.be/eVOqZXdjFhQ

AKFA SDTV 21.png

How to Keep the Side Mount - Roll Prevention!

You have the Side Mount (aka Side Control). Now, you have to keep that position. Your attacker is not going to be to happy with you in that position, and may try to roll you off. If you don't know how to stop this rolling, they will get you off of them!

So, from the Side Mount, if they roll in the direction of your "underhook", ie, your arm that's under theirs, you post that arm out. Reach out and plant the palm flat out on the ground.

If they decide to roll the other way, you push from your posted leg, where your sole should be flat on the ground. Incidentally, when they do roll that way, and you push from your posted foot, remember to bring your posted HAND back, clasped onto the neck-hugging hand. Why? It's because it will keep you in tight, and close, and you're able to put more of your body weight on them. 

This is a very effective way to maintain the Side Mount on a street attacker who is unfamiliar with the position and is trying to throw you off. 

Follow me for more Martial Arts Instruction on social media:
Twitter - @AustinKungFu
Instagram - @AustinKungFuAcademy
Facebook - Facebook.com/AustinKungFuAcademy

https://youtu.be/gOyJCKfHU7k

AKFA SDTV 20.png

How To Do a Side Mount

This is all about getting into side mount, also known as side control. Here we cover some nuances on how to make this a very strong controlling position. 

We just knocked them down with Double Ankle Sweep. Now we want to control the fight and make sure they are not going to get up and start attacking us. So to that end, we run to the side of them, as they start to sit up, we push down on their chest like a push up, lower ourselves down chest to chest, have our left arm under their neck and right arm under their arm, with our hands clasped together (this is if we've run to the left).

We want to make sure our legs are spread, with our right foot's top flat down against the ground. This helps establish a very heavy hip pressure on them. Our left foot is posted, with the bottom of the foot flat against the ground, knee bent. 

Be sure to turn your head away from them to minimize the chance of their hand coming to your face (but if it does happen, we do have a defense against that).

This is a major position in ground fighting. Get this position down solid. 

Follow me for more Martial Arts Instruction on social media:
Twitter - @AustinKungFu
Instagram - @AustinKungFuAcademy
Facebook - Facebook.com/AustinKungFuAcademy

https://youtu.be/-PR3IC38tZ4

maxresdefault (2).jpg

Trap & Roll From Punches (ie How To Escape the Ground-n-Pound!)

Being mounted by someone in a street fight is the worst place to be. Why? Because when you're on the bottom, if you extend your fist towards them, your range is very limited. When they extend their fist downwards toward your face, not only do they have more range, they also have gravity to their advantage.

When someone punches at you from the top mount position, this is known as the "Ground and Pound". It is critical that you have a plan to get out of there. And let me say this before even going into the technique on how to escape this dangerous situation:
TIMING IS EVERYTHING.

You can know all the steps and details for this escape technique, but if your timing is off, you might not be successful with it. So it's important to immediately recognize the indicator. What is the indicator? The moment they decide to posture up and punch. That posturing moment is when you go after them!

-Shield your face and sit up and hug them tight, wrapping your arms around them and gluing your head to their chest. 
-Push off your feet to bring them down (they will land on their hands, reflexively to avoid their face hitting the ground.
-Then bring your hands on their shoulders and scoot yourself up a little higher. 
-wrap their arm and trap that same side foot.
-you then make your bridge, use your right arm to lift up as you lift your hips and turn over onto your knees.
-stay in close, bring your elbows down and in to suffocate their hips, and keep your head on their abdomen.

The technique works. But the only way to make it work is if you time it right. Let me say it again to emphasize it:
The moment they begin to posture up to throw the punch (ie even before they throw the punch - just sitting up a little bit), that's when you go and hug them!

Practice this one a lot. First just get a feel for the steps and the actual move. Do it slowly. Then, once you are comfortable with the steps, work on the timing of it. 

maxresdefault (10).jpg

Follow me for more Martial Arts Instruction on social media:
Twitter - @AustinKungFu
Instagram - @AustinKungFuAcademy
Facebook - Facebook.com/AustinKungFuAcademy

https://youtu.be/BqQXTlzx3XM

Open Guard Pass

You've rolled them off you successfully. Now, you are in between their legs. This is called the Open Guard.

Chances are, on the street, the attacker does not know the value of the closed guard. So what you will want to do is make your way past the Open Guard and get into the most dominant position, which is the Mount. 

So to begin, it is important that you hug their hips with your elbows. Keep your head completely down on their stomach and turn it to the side. This way you stay safe from punches. Now when they try to get up, push off of your legs and knock them down. Still keep your torso and head low and connected to them, just buck forward pushing off your legs. 

Once they have calmed down and stopped, that's when we do the actual Open Guard Pass. First, push down their right leg with your left hand. Then slide your knee/shin up their inner thigh - it's okay to keep your ankle connected to their inner thigh. Then take your left arm and slide it behind their neck. Then, post out your right hand (like you do for Hooks and Hands). At this point, if they tried pushing you off, you are too heavy and based out, they will most likely not be able to move you much. Then, just slide your right leg over their left, and get into the Mount position. 

It is important to stay low and close to them the whole time. Any time there is space, that's generally an opportunity for them to either strike or throw you off, which means you could lose control, or worse yet, get injured by strikes. So stay in close! 

Follow me for more Martial Arts Instruction on social media:
Twitter - @AustinKungFu
Instagram - @AustinKungFuAcademy
Facebook - Facebook.com/AustinKungFuAcademy

https://youtu.be/DBjjrfPOPsg

maxresdefault (9).jpg

Trap & Roll Against a Mounted Choke!

In a fight, the goal is to get the top position once the fight goes to the ground. The problem is that things don't always go according to plan. Against a larger attacker, you are likely to end up on the bottom of the mount position, which is the worst place you can get stuck in a fight. From this position, the attacker can strangle you, and you cannot effectively strike back. You will most likely panic, and flail around and exhaust yourself. 

The Trap and Roll technique is a simple and reliable way to remove your opponent from being on top of you. 

So, your opponent chokes your neck. Make sure to trap their hand, arm, and leg all at once. Bridge your hips high, roll over your shoulder, and bring your knees underneath you. The most common error is too roll sideways, instead of keeping the bridge up as you roll (which will send you to an angle.

Follow me for more Martial Arts Instruction on social media:
Twitter - @AustinKungFu
Instagram - @AustinKungFuAcademy
Facebook - Facebook.com/AustinKungFuAcademy

 https://youtu.be/-ksdYehUKqk

maxresdefault (8).jpg

Figure 4 Lock Submission Technique

It's time to end this fight, and gain full compliance from the attacker. You've neutralized the attack by clinching, and taking them to the ground, you've neutralized all of their attempts to get you off of them, but yet, they are still not complying, so now we need to end this fight and gain compliance from them.

Since we just did Hooks and Hands, we are perfectly set up for the Neck Hug Figure 4 Lock. It's also sometimes known as The American Key Lock, or The Americana.

In this particular variation, we keep in our leg hook and neck hug. With the other hand (that was the posting arm) starts punching them on the ear. We are not necessarily punching to cause damage, although if we do, it is a self defense situation. But our goal is for them to raise their arm up to protect their ear/head. When they do, we pin that raised arm (with our hand that was punching) to the ground, we feed to to the other hand (who's arm is currently wrapped around the back of their neck). We then take the once punching hand, bring it under their tricep/bicep area, and grab onto OUR OWN wrist.

Now, from there, this part is very important, in order to make the technique work. You must un-loop your neck hug arm from around their neck, and land it right next to their head. 

Now you're ready to do the submission. Turn your face away, so they can't eye gouge you. Press their arm into the ground, pull their arm down (with your hands), while you lift their elbow up with your forearm. This will cause a shoulder dislocation/torn rotator cuff. They will be forced to give up.

Hold them their until you gain compliance. 

When practicing with partners, please make sure your partner taps on you to release. And of course, make sure to respect the tap, and release them.

This is a fantastic and quick submission technique that allows you to still maintain control with the leg hook. I say this because some submissions require you to momentarily transition out of a control mechanism in order to make the give up through pain compliance.

Be sure to really drive your hip into them on the side of your leg hook, that way they cannot roll you off. 

Have fun with this one, it's really effective!

Follow me for more Martial Arts Instruction on social media:
Twitter - @AustinKungFu
Instagram - @AustinKungFuAcademy
Facebook - Facebook.com/AustinKungFuAcademy

https://youtu.be/z7K4nGNsqVo

maxresdefault (1).jpg

Hooks & Hands! Keep the Mount!

So now that you've gotten the mount by perhaps a Leg Hook Take Down, you have to keep the mount. They may try to push you side to side to roll you off. Remember, they are bigger, stronger, heavier, more athletic, and crazy aggressive! So using your hooks and hands is a good way to keep the mount position in just such a case.

The "hooks" refers to your leg hooking inside theirs. The key to this is to drive your hip pressure downward. That leg that does the hook, the same side arm wraps around the back of their neck, while the other hand posts out. Your attacker will feel like you weigh 300 lbs! When they push from the other side, you simply switch everything to the other side (leg hook, neck wrap, and posting arm)

Honestly, changing the posting out arm and the neck hug is not all that necessary. You could keep that in one position, and just let your leg hook do the work, if they push from one side then the other. The arms/hands are basically reinforcements.

But, to train mobility, lets go ahead and drill everything changing when you get pushed from the other side. 

maxresdefault (7).jpg

Talk about getting comfortable with the closeness! I realize that this might be a little uncomfortable to do at first because of how close you are with your partner, however, when you have your partner legitimately try to push you off, HARD, you will very quickly be grateful for this technique because it just works! 

From here, the attacker might not know what to do, and might just give up!! In UFC 1, Royce Gracie defeated Art JImmerson by simply mounting him! No Ground & Pound, no submission, just by trapping him in the mount position!

So drill this mount control position well. It addresses  one of the many predictable things people will do when you get on top of them.

Follow me for more Martial Arts Instruction on social media:
Twitter - @AustinKungFu
Instagram - @AustinKungFuAcademy
Facebook - Facebook.com/AustinKungFuAcademy

https://youtu.be/DoXoMEcC_2c